
NOTE: TracerPlus PC is officially released and is no longer in Beta.
Installation
- Download TracerPlus Desktop 10.3 and TracerPlus PC (Link given in order confirmation email)
- Run the installer, and complete the step-by-step installation wizard.
Registration
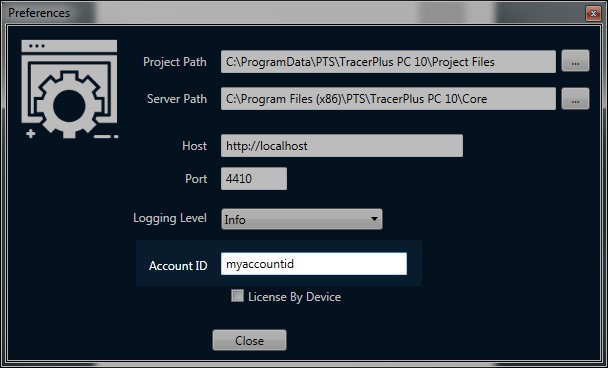
After purchase, your order confirmation email will provide you with an Account ID. This Account ID will need to be entered into the Tools --> Preferences dialog of TracerPlus. Once completed, simply click the Close button.
Registering this way will refresh TracerPlus to the Login form. Login using your credentials provided in the order confirmation email.
Deploying a Project
Deploying a project is very similar to using an iOS or Android-based device. Follow the steps outlined below:
- Open your TracerPlus Desktop project using TracerPlus Desktop.
- Click the Build/Deploy option.
- Select Windows/PC and Use deploy server.
- Click Deploy.
Next, use the TracerPlus application to download the new project. Follow the steps below:
- Select the Menu button, and click Download Project.
- Enter the deploy server IP address and port (if this is the same PC you can enter localhost).
- It might look something like this http://localhost:4409 or http://192.168.1.100:4409.
- Click the refresh button to populate the Project drop-down with all of the available projects.
- Select the project you wish to deploy.
- Select Download.
The TracerPlus Desktop project selected will now be deployed. When complete, you will see a Refresh button at the bottom of the screen. Press this button to refresh TracerPlus with your newly deployed project.
Reporting issues
Since this is a beta release, we encourage our users to report any issues to https://support.tracerplus.com/conversation/new. With this information, we can build a list of defects and notify you when resolved in either a later beta release or in the final release as appropriate.
Comments
0 comments
Article is closed for comments.